

Many websites can pass an accessibility scan and still fail real users!
Automated reports may show no critical errors and a clean bill of health, but that does not guarantee the experience works with assistive technologies. Yet when the same product is used with a screen reader, navigation can break down quickly. Buttons may not be announced correctly, form fields may lack context, and entire sections can become difficult to interpret without visual cues.
The gap comes from how accessibility is evaluated. Automated tools can flag missing attributes or contrast issues, but they cannot replicate how users actually navigate content using a screen reader. These users move through headings, links, landmarks, and interactive elements in a structured, non-visual way. When the underlying semantics or interaction logic is flawed, the experience becomes fragmented, even if the interface appears correct.
Screen reader testing addresses this gap by focusing on real user interaction rather than surface-level checks. It helps teams understand whether a product is truly usable, not just technically compliant. Instead of checking for isolated issues, it reveals how content is read, how interactions flow, and whether users can complete real tasks without friction.
This guide breaks down the tools, workflows, and practical steps needed to conduct effective screen reader testing. It also highlights the most common accessibility failures that only surface when you test with real screen reader behaviour, not just automated reports.
Let’s dive into what effective screen reader testing really looks like!
A screen reader is a tool that reads digital content aloud or converts it into Braille, a system of raised dots that can be felt with the fingers, allowing users to navigate websites and applications without relying on sight. This makes screen reader accessibility fundamentally dependent on how well the interface is structured beneath the surface.
The sections below explain how screen readers work in practice, who relies on them, and why implementation details directly impact usability:
Screen readers interpret the underlying code of a page and convert it into spoken output. They do not rely on layout, color, or visual hierarchy, but on semantic meaning and document structure.
This means a screen reader user can:
For example, imagine a “Submit” button that looks correct on the screen but is built using a generic <div> instead of a real button. A screen reader may not recognize it as something clickable. Instead of hearing “Submit button,” the user might just hear “Submit” or nothing at all, making it unclear that an action is possible.
Screen readers are used by a wide range of people, each interacting with content differently depending on their needs and context.
This diversity is important. Screen reader usage is not limited to a single user group or scenario. The same interface must support different navigation patterns, speeds, and expectations.
Screen readers rely on code, not visuals. They need clear signals to understand what each element is and how users can interact with it.
Semantic HTML provides these signals. Elements like <button>, <nav>, <form>, and headings tell the screen reader exactly what something is. When used correctly, users hear clear, actionable information.
ARIA is used only when standard HTML is not enough, such as in custom components like modals or dropdowns. It helps define roles and states, but it should not replace proper structure.
If the structure is unclear or incorrect, the screen reader cannot interpret the interface properly. As a result, users may miss actions, lose context, or be unable to complete tasks, even if everything looks correct visually.
Accessibility issues are often treated as isolated checks. Teams run automated scans, fix flagged errors, and assume the experience is usable. In reality, passing these checks does not guarantee that a user can navigate or complete tasks with a screen reader.
The difference lies in what is being evaluated. Automated tools focus on code-level compliance, while screen reader testing reveals how the product actually behaves in use.
Automated tools can detect missing alt text, labels, or contrast issues, but they cannot determine whether users can understand the content or complete a task. Screen reader testing exposes problems such as confusing reading order, unclear link text, or broken navigation flows that only become apparent during real interaction.
For example, a page may pass all checks, but a screen reader reads content in the wrong order, causing instructions to appear after the form fields.
Accessibility is not only about content being readable. Users need to perform actions such as filling out forms, navigating menus, or completing a checkout. Screen reader testing ensures these flows work end-to-end using keyboard navigation and assistive technology, not just visually.
For example, a checkout form may look complete, but without proper labels, a user hears “Edit, blank” instead of “Email address,” making it impossible to proceed confidently.
A product can be technically compliant with accessibility guidelines and still fail users. Screen reader testing bridges this gap by evaluating the actual experience. It confirms that structure, semantics, and interactions work together to create a usable interface.
For example, a dropdown menu may meet code standards, but if keyboard focus does not move correctly, a user cannot access all options.
Choosing the right tools is a key part of effective screen reader testing. Different screen readers interpret the same interface in slightly different ways, which means relying on a single tool can leave gaps in your testing coverage.
The tools below represent the most widely used screen readers across desktop and mobile environments:

Using a screen reader is fundamentally different from using a visual interface. Instead of scanning layouts or clicking with a mouse, users rely entirely on what is announced through audio.
During screen reader testing, do not use a mouse. Rely only on what you hear. If something is not announced, it does not exist for the user.
Testing typically follows two passes:
Use a real screen reader such as NVDA (Windows), JAWS, or VoiceOver. The steps below use NVDA for accessibility testing:
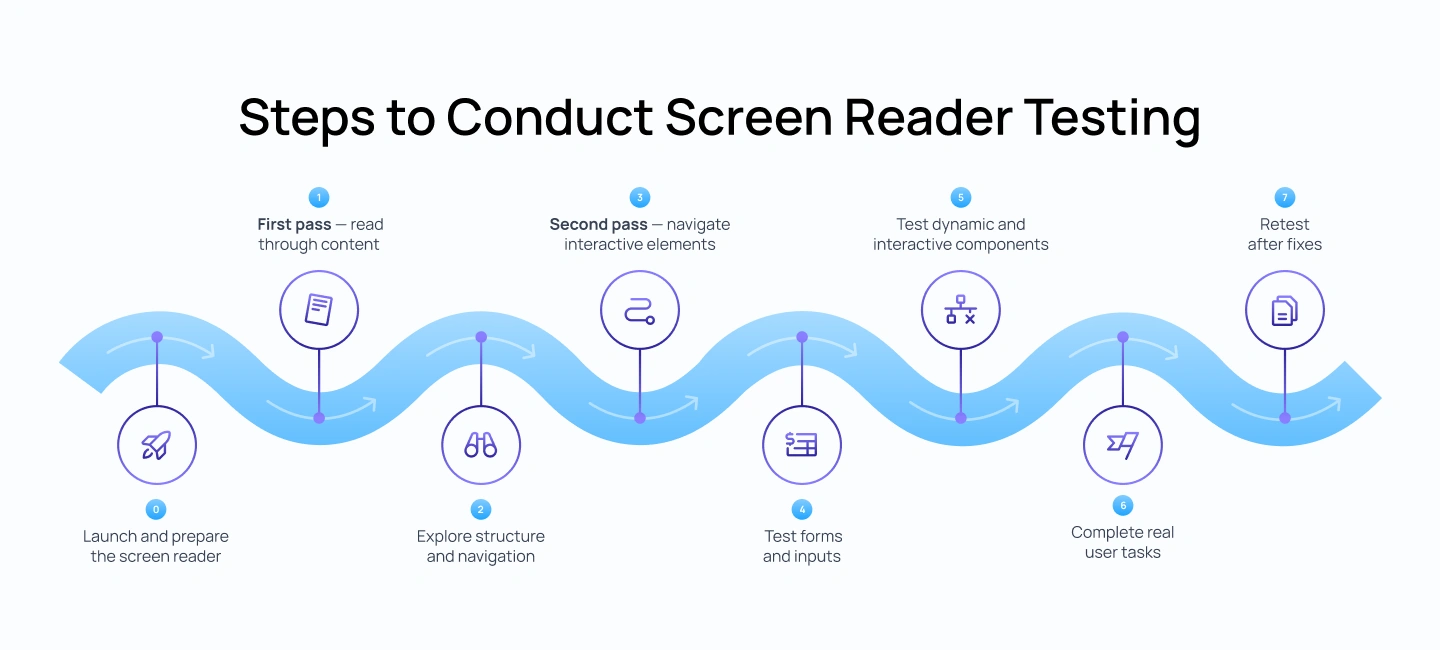
Before testing, you need to set up the environment exactly as a screen reader user would experience it. This step ensures that NVDA is running correctly, the page is loaded fresh, and your starting point is consistent.
Start NVDA:
Prepare the page:
Set the correct starting position:
This setup is important because screen reader testing depends on a consistent starting state. If the page is not reloaded or focus is not at the top, the reading order and behavior may not reflect the real user experience.
Ask yourself: Is the screen reader starting from the very beginning of the page, with no leftover focus or interaction state?
If not, reload the page and reset focus before continuing, as an incorrect starting point can invalidate the entire test.
This step focuses on understanding how the page is presented to a screen reader user without interaction. The goal is to evaluate whether the content, when read linearly, forms a clear and complete experience. At this stage, you are not trying to use the interface, only to understand it as a continuous flow of information.
Use the Down Arrow key in NVDA to read line by line, starting from the top of the page. Listen carefully to how each piece of content is announced and how it connects to the next.
Check:
Ask yourself: Can I clearly understand the page without seeing it?
If not, take these actions:
Once the content is readable, the next step is to evaluate how users move through it. Screen reader users rarely read everything sequentially. Instead, they rely on headings, landmarks, and shortcuts to scan and jump between sections.
Using NVDA, navigate the page using structural shortcuts rather than reading line by line. This helps simulate how users quickly orient themselves and locate relevant content.
Use NVDA shortcuts:
Check:
Ask yourself: Can I quickly understand how the page is organized and move between sections?
If not, take these actions:
After understanding content and structure, shift to interaction. This step evaluates whether users can operate the interface using keyboard navigation and whether each element communicates its purpose clearly.
Return to the top of the page and begin navigating using the Tab key while NVDA is running. As you move through each element, focus on how it is announced and whether its purpose is clear without visual support.
Check:
Ask yourself: Do I know what each interactive element does just from what I hear?
If not, take these actions:
Forms are one of the most common points of failure in accessibility. This step focuses on whether users can understand what is required, input information correctly, and receive feedback at the right time.
Navigate through form fields using the keyboard and listen carefully to how each field is announced in NVDA. Pay attention to whether the label, role, and state are communicated clearly before interaction.
Check:
In NVDA, a correct field should sound like:
Ask yourself: Can I complete this form confidently without guessing?
If not, take these actions:
Modern interfaces rely heavily on dynamic behavior such as modals, dropdowns, and real-time updates. This step checks whether these interactions are properly communicated through the screen reader, especially when content changes without a full page reload.
Trigger interactive components using the keyboard and observe how NVDA responds. Focus on how state changes, focus movement, and updates are announced.
Check:
Ask yourself: Do I know when something changes on the screen?
If not, take these actions:
After validating individual elements, test complete user journeys. This step ensures that the experience works end-to-end, not just in isolated parts. It reflects how real users interact with the product to achieve specific goals.
Using NVDA, attempt realistic tasks from start to finish without relying on visual cues. Pay attention to where the flow slows down, becomes confusing, or breaks entirely.
Examples:
Ask yourself: Can I complete this task from start to finish without getting lost?
If not, take these actions:
Accessibility testing is not a one-time activity. Fixing one issue can impact other parts of the experience, especially in complex interfaces where components are interconnected.
After making updates, repeat the same testing steps using NVDA to ensure that the original issue is resolved and that no new issues have been introduced.
After fixes:
Ask yourself: Is the experience now consistent and predictable after the fix?
If not, take these actions:
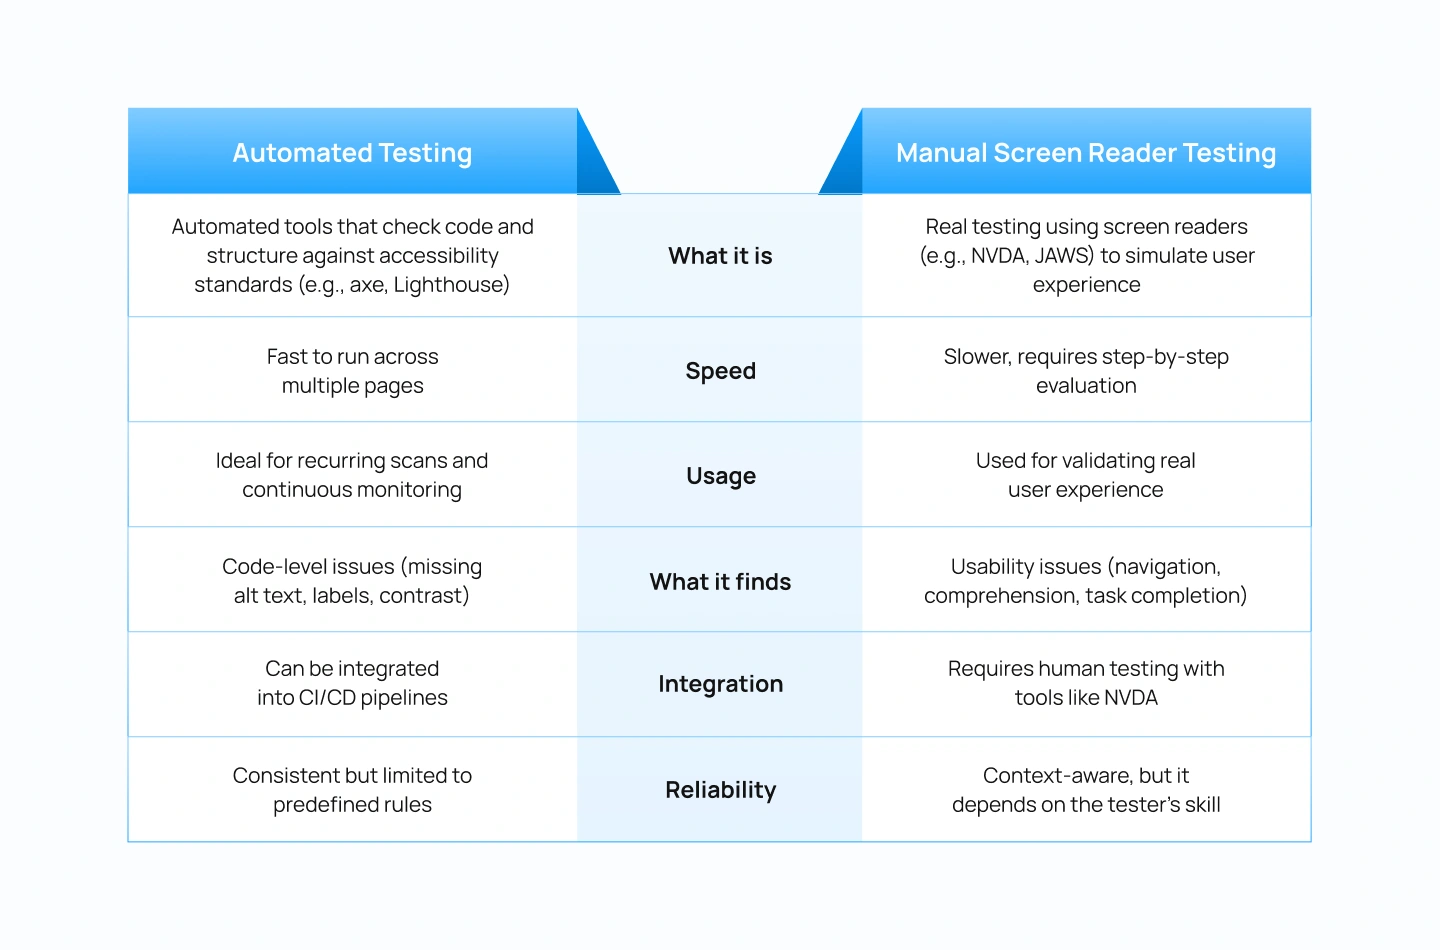
Accessibility testing often combines both automated tools and manual validation. While they are frequently used together, they serve very different purposes. Understanding this distinction helps teams avoid over-relying on automated reports and missing critical usability issues.
The comparison below highlights how each approach contributes to screen reader accessibility testing:
Many accessibility issues are not caused by complex interactions, but by small implementation gaps that break how content is announced. These failures often go unnoticed in visual reviews but become immediately apparent when tested with a screen reader.
The issues below represent the most common patterns that impact screen reader accessibility and prevent users from navigating or completing tasks effectively:
Screen reader testing is not an optional layer added at the end of development. It is a critical part of evaluating whether a product actually works for users who rely on assistive technologies. While automated tools help identify surface-level issues, they cannot determine whether users can successfully navigate, understand, and complete tasks.
By incorporating screen reader testing into regular workflows, teams can identify structural issues early, validate interaction patterns, and ensure that accessibility is built into the product rather than fixed later. Testing with tools like NVDA or VoiceOver enables a non-visual experience of the interface and helps uncover issues that would otherwise go unnoticed.
For product teams, this shifts accessibility from a checklist to a design and engineering practice. It influences how components are structured, how interactions are defined, and how quality is validated before release.
As a UI/UX design agency, Lollypop Design Studio focuses on creating products that are usable, scalable, and aligned with accessibility best practices. By considering accessibility early in the design process, teams can build interfaces that are easier to navigate, more consistent across platforms, and better suited to real user needs.
If you are evaluating your product’s accessibility or planning improvements, you can schedule a consultation with our team to identify gaps and define a clear path forward.
Screen reader testing is the process of using a screen reader to test website with screen reader to evaluate how a website or application is announced and navigated without visual cues. It focuses on whether users can understand content, navigate structure, and complete tasks using audio feedback.
There is no single best tool. NVDA is widely used for Windows and is a strong starting point because it is free and reliable. VoiceOver is essential for testing Apple devices, while JAWS is commonly used in enterprise environments. Testing with at least one desktop and one mobile screen reader is recommended.
NVDA is a free, open-source screen reader for Windows, while JAWS is a paid tool with advanced features and strong adoption in enterprise and compliance-driven environments. Both are widely used, but JAWS is often required in regulated industries.
Some platforms offer remote testing environments, but the most effective testing is done locally using tools like NVDA or VoiceOver. This allows you to interact with your product directly and evaluate real user behaviour.
Screen reader testing should be performed during key stages such as design validation, development, and QA. It is especially important before major releases, redesigns, or when introducing new features.
No, automated tools are effective for identifying code-level issues such as missing labels or contrast problems, but they do not reflect how users actually experience a product. Manual screen reader testing is necessary to evaluate navigation, comprehension, and task completion in real use. In practice, both approaches should be used together: automated testing for coverage and efficiency, and manual testing to validate real usability.


